Category: Tohatoha | Share

Steam; Technology

Hello! It’s been a while since I’ve updated about my technology experience. This term my group (1), is now in steam class! For the first week, we looked at something very intriguing, the Scientific Method. Here is a diagram I took online to give you an idea of what a scientific method could be.The Scientific Method of Success | School of Chemistry & Biochemistry

Storm in a Jar

In that same week, we looked through a project called “Storm in a Jar”. Obviously, there’s not a literal storm trapped In a jar, but the name comes from its appearance when the experiment is completed.

This science experiment is  quite simple, it involves; water, shaving cream, two jars, and food colouring (any colour).

Get a jar, then fill it up halfway with water. This can be Jar A. Next, coat the top of the water from jar A, with shaving cream—that’ll play as our cloud to support the term “storm”, you’ll see soon.

Take your separate jar and fill it halfway with water. We will call this jar B. Pour a bit of food dye inside jar B, then stir it. After a good stir, take a table spoon of jar B’s liquid and pour it on top of jar A on the shaving cream.

The food dye liquid should be able to break through the shaving cream, and create the illusion of a storm in a jar. Cool, right? Completely harmless too, just don’t try drinking it…


Robot Frogs

For the other few weeks of tech, we’re focused on a quite interesting topic—The Study of Robots. Our project is a robotic frog, there’s no grouping in this project, we’re supposed to make one ourselves!

The robotic frog, not what you think it is—-yeah I know what your thinking, its not some flashy metal robot frog, but really, it’s basically just cardboard that jumps, powered by batteries and a rubber band–yet I see where ‘frog’ comes from because the cardboard is almost shaped like a frog.

This project includes:

Cardboard, Batteries, A motor, Skewers, rubber band, and Popsicle sticks.

Measure 14 CM and 7cm to make a triangle. Draw exactly 4 triangles then cut them ou
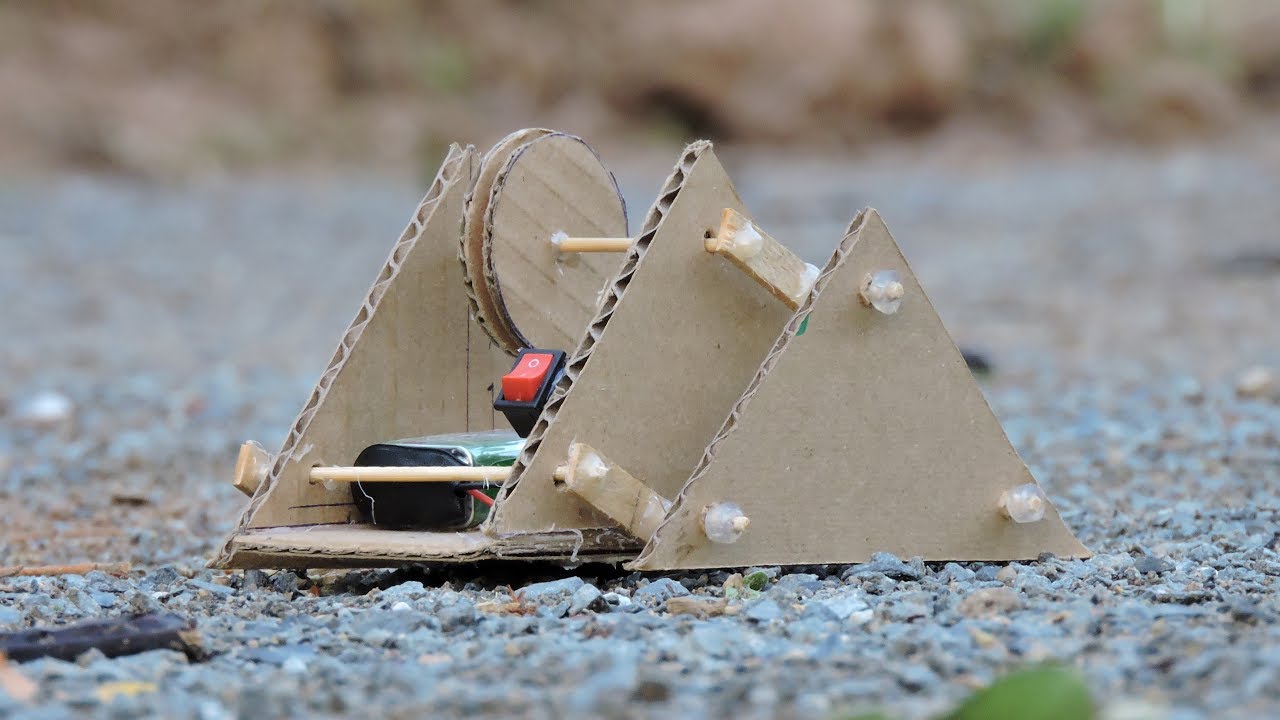
How to make a Frog Robott.

Use the same measurements to make a rectangle and cut it out. Next, get a glue stick, or any cylinder so you can trace it on cardboard and make three perfect circles—cut those out.

With your triangles, poke a hole near each corner, do this with all your four triangles. Then get your circles and poke a hole in the centre of each of them.

Now with the rest, I’m not sure what happens next because we haven’t finished our project, but I’m sure the following bits include hot glue, if you’re interested, the video is in this link!

Link

That’s basically all I can recall from tech, if you have many questions, dump them all in the comments, I’ll try my best to reply to them.

Thank you for reading, have an amazing day.

Maths ; Working with Spreadsheets.

Kia ora, Reader! This week has been pretty interesting—there’s been a lot of testing lately which I’m pretty sure all of NZ is aware of.

For Maths, I focused on working with spreadsheets. On the oxford book it shows us how to use spreadsheets—though, theirs is quite different, the spreadsheet compared to Google Sheets still works similarly, which gave me the same and designed results.


On the bottom, there should be two texts like links; ‘Task’ and ‘Extra’.

Under the heading ‘Task‘, is based off our oxford books. In our books, they show how spreadsheets work by showing us how to solve 7 times tables.

The first thing we had to do was open a new google spreadsheet, then on column A, row 2, we were told to type the number 1, then on the rest of the rows below, we continue 1 to 10, so the number 10 should end up on A11. On row 1, column A, we write ‘7x’.

On column B (Next to column A), it instructed to type in the number 7 from B2 to B11—reason is, we’re going to times numbers 1 – 10 by 7. The easiest way to write numbers down quickly, is to drag it down by the corner and let go on the designated spot.

To solve it 7 x n, on column C, row 2, the column beside the two, you type in “=a2*b2”—writing this would give you the results to “1 x 7”. By dragging the formula “=a2*b2”, all the way to row C11, it’ll provide you with the answers to 7 times 1 to 10.

The sum is 55. How? On column A12, the number 55 is created by typing in =SUM(a2:a11) (Spaces and uppercase letters aren’t necessary.) Then when returning/entering ‘=Sum(a2:a11)’, you’ll be provided with the sum!

The other thing our book showed us, pressing the heading, ‘Extra’, our books showed us what to write next, on our table.

I’m not quite sure what points are for, but basically we were told to write the countries from the book, and the points beside it. Under the column ‘Difference’, I wrote a formula, ‘=B2-C2’, which gives you the answer for 210 – 32. By dragging this formula, you’ll get the answer to all of them. Then selecting A1 to D6, click insert, then choose Chart and then choose column Graph, which’ll give you that data thing.

Using spreadsheets helped me realise how important they are, you could use it financially, data wise and personal use—which are important to keep track of.


I really hope you’ve learnt something on this post, if you’re confused about anything or notice my grammar is off, please inform me so I could fix it for future readers!

Question before you go, Have you ever used spreadsheets before? If so, do you use it for school or just in general? Let me know so I could get ideas on what I could use spreadsheets for! Have a nice day.

Fake or Not? Internet Hoax

Kia ora, reader!

Everyday, on the internet—there are many things that could be fake, or just unbelievable. People get fooled and believe all these hoodwinks online, which was why yesterday, on Tuesday, our instructor introduced us to this video—‘Fake or Fact’. In this video, it showed how easily fooled we are when it comes to the Internet’s hoax.

To identify if something is fake or not—let’s say someone spots an alien and shares about it online, sounds real fake right?  The first thing to do is ask a trusted adult to gain their knowledge. They could be your parents, a teacher—anyone. With their knowledge, you’re already a leap ahead of finding if this is real or not.  Then you do some research. By researching, you’ll simply find more info, by fusing your trusted adults knowledge with the online’s, it’ll eventually lead you to an answer (hopefully).


Our activity for this task, was to take photos of ourselves (from head to toe) and using the ‘Remove.BG’ website, it crops out the original background in your photo. We take those cropped background photos of ourselves and edit them to another location to create the illusion that we were really there.

Obviously, this is just for fun and educational purposes. Here is my finished product to my two snapshots, the photo on the right is me visiting the Cook islands,  and on the left, I have to be honest it may seem fake but it’s really me on my Lamborghini.


The whole purpose of this is to be aware of false information provided all over the internet. AI could potentially fool you, if you didn’t know—they’re improving. Please don’t get fooled online! When I said the image with the Yellow Lamborghini and me was real, I was obviously joking. Again—don’t get fooled!

Take care.

World’s First; Discovering innovative inventors

Hey there! This week, our substitute teacher assigned us to some history mahi (work).  Basically, he created a new Google Document, and inserted a table. On that table it shows us 12 topics for us to research about. EXAMPLE: Heading; First Laptop. You have to find out who created the first Laptop, where and when.

Please inform me If you’re not able to access my document. — > Writing 

The whole purpose of this should be pretty obvious—not only this is a part of history, we’re gathering information of those who made a significant impact on our earth, and shall be thanked and remembered for their invention / Doing.


Hope you enjoyed reading, I apologise for the lack of words. How have inventions changed  your life?

Please comment if you have any questions—or just comment if you enjoyed my post.

👋 Farewell, Reader.

Play-Back: Recapping the First Week

Greetings, Reader.

New term, and the last 🥳! On this post, I’ll be recapping my learning in the first week 📚.  Not only I’ve learnt a few things you might learn new things too!

📖 Reading / Literacy

Starting off with literacy, we were looking at tides and how they function. Honestly I’m really glad to learn about tides, because the next time I go to the beach, I’m gonna brag and annoy my family with how the tide works. Anyway, I introduce you to my very specific writing about The Science of Tides; Link to Writing

If there are any questions or if I forgot to add something that defines tides, please inform me by commenting! While you’re at it, tell me if you learnt something new about tides from my writing!

For reading, my group (Kereru) is looking at this school journal book ‘Mahi Tahi’,  at the content ‘Testing the Waters.”

The protagonist in this story is a little kid named Tāne, fishing with his  dad. They spot these men with heavy fishing gear. One man in particular was digging this long black rod into the lake — it’s to test the pH level, which measures how acidic or basic the water is.

This algae which is highly toxic to mammals, called Algae Blooms, drastically changes the pH levels making it toxic. The algae suffocates the freshwater fish, so the man is making it safe for fishes and mammals by testing the water and clearing them out.

This is a brief way of explaining this book, if you want to know more I’d be more than happy to tell you!

📐 Maths

Next for Maths, we looked through algebra—Algebra may seem scary but honestly that was my thoughts too before I even started it, I wanted to hurdle in a corner and cry mentally and physically when I saw the solving 2x+7=15. But actually It’s pretty easy and adaptable once you understand it. As a matter of fact, you don’t know it but you use algebra in your day-to-day life, like financially, cooking, speed, time, and more.

What Is A Linear Equation?

Recalling my experience, the first concept we looked through was Linear Equations. It turns out, the name “Linear” tells you everything you need to know about what this tool does.

A linear equation is an equation (meaning it has an equal sign) that uses variables. Here’s what that means and why these equations are the foundation of so much Maths: 

Linear equation means an even equation—like a perfectly balanced balance scale, one side that’s equal to the other, also referring to this specific symbol ‘=’.

As you correctly noted, the equal sign means both the left side and the right side are precisely equal. I think of this as a balance scale (which I mentioned in the previous paragraph): whatever is on the left must perfectly balance what is on the right.

A perfect example is this linear relationship: .

This equation tells a story: the value of is always 5 units more than the value of .

  • If , then .
  • If , then

Hope this helped, not sure if I explained well, but this is all the information I could provide—just ask questions then I’ll try to help out! I also did a little digging on Google and found a diagram that would surely help you out. This diagram is very helpful in my opinion.  If you have any questions feel free to ask them!


📝 Writing

Lastly for writing last week, we started a new unit on explanation writing, which is super practical. We specifically looked at breaking down the water cycle (how does it rain?) into clear, sequential steps. It was surprisingly fun to structure the information logically, moving from Evaporation to Condensation to Precipitation in a way that flows easily for the reader. It made me realise that good writing is often just a matter of good organisation. Link <— LINK TO WRITING)

I hope you could learn a thing or two from my writing about rain!

Thank you for reading! Remember, if you have any questions feel free to ask.

Have a nice day, Adios.


Thinking Like an Engineer: My Project Reflection

Kia Orana, Reader! For the past three weeks, we’ve been focusing on engineering. In the first week, all senior students gathered in two adjacent classrooms and formed a group with three or four people. Each group then chose a specific type of engineering to focus on and created a project related to that field. After deciding on their project, each group receives an exercise book which they personalised by designing a cover and title for their group.

Skills Learnt

One of the most important things I discovered was problem-solving. During my project my group and I faced many challenges, we struggled planning to make our design a durable bridge that works well. Instead of giving up, we thought outside the box and desperately tried different ideas until we found solutions that improved our project. This taught me that problem-solving is really about being patient, creative, not giving up, and willing  to try new approaches. It was great to see how fixing these problems helped our project to become successful, and I know this skill will help me in future projects too.

Challenges Faced

One of the biggest challenges we faced during the project was sharing resources. Even when my group was at our lowest, we stayed kind and thoughtful. However, there was one group nearby who really held onto the hot glue gun like it was their lifeline. Because we were a bit farther away, they had more access to it and used it for most of the day before returning it to the classroom. This made it hard for my group to get a turn with the glue gun, which was frustrating. Now my group had a last minute project because of them.

Another challenge that I found frustrating was distractions within my group. Sometimes, we would all be working on different parts at the same time, which made it hard to stay focused together. We also got distracted by talking about things not related to the project. At times, we would all focus too much on one part and forget about other important tasks, which made our project a bit harder to manage.

The last challenge I can recall was working as a team. We didn’t really understand the plan because we weren’t communicating well or sharing how the project should flow.

Feelings

Throughout creating our project, I found myself distracted by a lot of thoughts which made it hard to focus. Because of this, I lost interest in listening to my group’s suggestions—even though they tried to help and contribute. At some point I was on the verge of crashing out because my group was willing to help other projects, despite us being far behind. They were also very distracted by non-work related things, which was my last straw, but I managed to compose myself thankfully.

Near the end, I was extremely worried on how our work was going to turn out—we were so far behind we had a last minute project that, I cant lie, doesn’t look great despite everyone in this group being the expected year 8’s.

Overall Experience

This was a challenging experience, but also fun because this taught me how to solve problems, plan, take responsibility, think and feel like an engineer! I hope you enjoyed my version of this experience, as there may be many more engineering reflections from my class. Thank you for reading! I have a question before you comment or anything—have you done something similar like related to engineering?

Have a nice day.

Engineering—Electrical Wires

Kia ora, Reader!

Today we looked through electrical engineering. Electrical engineering involves studying, designing, and focusing on designing, developing and maintaining systems and equipment that includes the use of electricity and electronics. Hope you enjoy what’s next!

Human Power

Our first educational activity was to get in a large group (like around 8-10 people), form a circle and pass a ball completely around without using our hands, dropping the ball or throwing the ball across to another to rush the process—reason being, if it was an actual electrical circut, it’ll be broken / cut.

This experiment is relevant to electrical engineering because it shows how electricity works (like how the wires power and stuff).

Powering LED Lights

Out of all engineering experience, this has to be by far my favourite one because I enjoyed attempting to power the LED* lights and attaching the copper strip.

In this experience, we were told to go in a group of 4—my group had 3 people in it because people didn’t want to join. Anyways, in our groups we were given an instruction sheet on how to power LED lights. Along with being given the sheet, it provided this Matariki themed card, and behind that card there was a layout on where to add the little LED thingies.

We have to fold the card, so the Matariki picture should be on top of the LED lights causing it to power and make the illusion of the stars glow. To get the LED to light up— obviously we had to add the little LED things (if you have no idea what LED’s are, I recommend searching it up.) we had this copper strip that’s sticky on one side—basically like tape but copper can power battery and not tape—stick the copper along lines that are supposed to be there for support to help us know where to add the copper, and at the end should be this circle battery that the copper connects to and powers up the lights.

My group failed to light the LED’s, maybe its because the copper strips collided because there was copper on each side, they aren’t supposed to collide otherwise they won’t light—which is why ours didn’t work.

Messed up or not—either way this experience was really cool and fun!

*LED means Lights Emitting Diode.

Ending

That’s all we’ve looked at through electrical engineering this weekI hope next week’s upcoming activities for electrical engineering are just as fun! If you genuinely read this post, I’m really impressed, I don’t think anyone has the patience to read this post, haha.

Comment if anything troubles you or if you liked something about this post please, thank you and take care!!


Seawalls – Engineering

Kia orana, Reader! On Wednesday this week, we competed in environmental engineering.

🪣💦 First Challenge

Our first challenge was outside, we were told to go barefoot, in a group of around 3-4 people, and were given two water buckets.

Our objective was to carry one of the buckets with transported water that held exactly 5 litres or so, to the other side then back.

One bucket was filled with 5 litres already, but with that bucket we had to transport all its water into the other bucket without losing water. Once transported, the problem settles in. In that bucket, there’s a hole outside of it causing the water leak—which would’ve been a challenge, if our team didn’t find a method that’ll prevent the water from leaking.

Our method was placing the bucket with the hole in it, inside the bucket without the hole—therefore the water ‘leaking’ could just be pouring inside the bucket beneath it. Smart right? 

Whichever team manages to complete this challenge with the same amount of water provided, wins—my team finished with the remaining 4.3 litres. We didn’t win however.

🌊🧱 Next Challenge

For the next challenge, we were inside, wore shoes, hurdle in the same groups we were in when outside.

Whilst being inside, our instructor, Ruth, introduced us to a video present in the beautiful island of Tuvalu. In this video, they showcased the seawalls that Tuvalu  has, since their island is slowly being consumed by water. Our task was to replicate seawalls in our group, using the following materials; five straws, a block of clay, paper and thick paper.

That’s all for today, thank you for reading my post!

💭 If you like or have any questions about anything, feel free to comment and ask anything below,

Take care!

Wood You Look at That!

Kia Ora, Reader!

Today I’ll be blogging about my experience through Technology at Papakura Intermediate.

This week on Monday, in the afternoon when lining up for tech(nology), we learnt that we’re assigned to a new technology class. Group 1 (My group) was placed for Hard Materials (aka wood work). When entering the building the first thing I noticed were all the machines scattered around the room, not literally, but they were around the room.

Our teacher has multiple nicknames for us to refer to him as – for this blog post I’ll refer to him as Matua. During the lesson, Matua taught us some safety skills to use throughout the workshop, which are; No running around (especially when holding potentially dangerous equipment), inspect objects before use, use safety equipment (Like safety glasses, earmuffs for loud operating machines, gloves, ect..),  maintain a clean and safe workplace (so no accidents are caused) and disconnect power after using a machine. These are important to keep in mind, so nothing bad happens whilst in the workshop.

Moving on, we were given a printed paper of 28 dominoes for us to trace on a blank piece of paper using a pencil – then soon coloured them using coloured pencils.  Ideally we had to trace them using a ruler, which I did but I calculated the ruling instead of actually tracing(?) if that makes sense.

I believe that’s all for now — thank you for reading! If you have any questions or liked anything about my blog, please tell me in the comments. Take care!

A Week of Progress!

Kia Ora, reader.

Today I am settling my finished work onto my blog post to show what I’ve been learning this week.

We were focusing on three specific people; Sir Bom Gillies, Maurice Gee and Sir Edmund Hillary. The three are very aspiring and were fantastic leaders for New Zealand! Then we looked through Matariki; the Maori New Year.


📚 Reading

For reading this week, we were given options to research about three national aspiring people; Sir Robert Gillies, Sir Edmund Hillary & Maurice Gee. I chose to write about Sir Robert Nairn Bom Gillies on a Google drawing using desired colours which I think would match the theme of Sir Gillies. On my DLO I’ve provided information about him. (His birth date and death date is under the title).  As you can see – I found online, a photo of his younger self (top), then a photo of himself (bottom). On the right bottom corner, portrays a drawn soldier holding a walkie talkie or some sort – I added it to fill in small gaps and represent Sir Gillies when he was in War.

I hope you like my DLO, and that I provided enough information about him. If you have questions about him, ask me in the comments please!

🧮 Maths

Moving on to Maths, last week, we did a pre-test looking through Prime and Composite numbers; thankfully way before that, our substitute teacher taught us all about Primes and Composites, so pretty much I got a decent score. When we finished gathering more knowledge about Prime and Composites, we finished the Post-test on it, now our new pre-test is Data Sources. My score was 75% because I got the first two answers wrong!! Let’s hope I do great on my post-test!

What I’ve learnt about Prime and Composites, a Prime number only has two factors, the two factors being the number 1 and its number alone. For composite, they have more than two factors, so any number that could add up to this number.

For example: Prime Number –

7 Is a prime number, here are number(s) that could multiply to 7;  7 x 1 = 7,   1 x 7 = 7. But if I were to do another number to replace the 1, like; 2 x 7 = 14, it’s not able to make 7! So you see how only two specific numbers could add up to 7? The numbers that created the 7 are called ‘Factors’ mentioned earlier. That’s what makes it a Prime number, because only two specific Factors were able to make the number 7.

Next example; Composite Number.

The number 7 is a prime number so it couldn’t be a composite! A composite has more than 2 factors, so if it has 2 factors that’s considered a Prime Number. Let’s use the number 6 as a demonstration; 6 x 1 = 6, 3 x 2 = 6. Can you see how four factors (1, 2, 3 ,6) were able to multiply to six? There were more than two factors.

I hope I did well explaining those! Please let me know if you’d like to know more about Composites and prime numbers or if you want an easier explanation about them. (I’m afraid that’s the easiest I could explain.. 😓!)

💻 Topic / Inquiry

For the Topic / Inquiry, we looked  through Matariki, the biography DLO (yes the exact one from the Reading Topic), then the Passion Project. (Look on my blog before this post, for an idea about a ‘Passion Project.’ if you have no clue what it is.)

Starting on my Matariki DLO, using the Google browser, Google Drawing, I really tried my best to create a dark purple gradient in the background to represent the sky when its night, in order for the star cluster which are added in the left top corner with listed names beneath them, to fit perfectly. The scattered rounded boxes are information about the Stars celebrated for the Maori New Year, and they’re a gradient colour some dark some light.

The title; “Te Tau Hou Maori” means ‘The Maori New Year” in Maori! Let me know if you have questions about Matariki!

Atlas, for my Passion Project this week, was actually an old one I’ve made but never got the chance to express it. It’s about the letter D and in which I did a Dragon fruit. I actually learnt A LOT creating this passion project, or it’s either my knowledge with a dragon fruit is very poor, but If you’re a HUGE fan of dragon fruit, or if you’re interested, I reckon you’re the perfect fit to look at my Passion Project! Check it out and let me know if you learnt anything fascinating 👀 ! Dragon Fruit.


Thanks for reading! Hope you’ve learnt something here, and if you’re wondering what I’ve done for the subject Writing, it was just my Matariki DLO. Cheers, God Bless !!